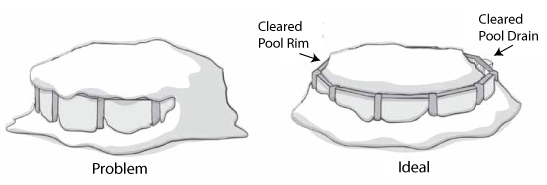
How to protect your above ground pool from collapse due to the weight of ice and snow (which is not covered under the Homeowners Policy).
Particularly snowy winters can wreak havoc on above ground pools, which are designed to withstand the weight of water in the summer but are more vulnerable to the pressure of heavy snow and ice in the winter. Also, melting snow in the spring can turn to ice and expand, potentially damaging the pool, especially the cover.
It’s therefore essential to keep a close eye on your above ground pool and regularly clear the snow off its cover so it’s never entirely buried under the snow.
IS YOUR POOL BURIED?
It’s important to clear off your pool before it collapses under the weight of snow. The following tips will spare your pool a lot of punishment and allow it to make it to spring in one piece!
- Stay outside the pool when removing snow. If you try to work from inside the pool, the snow or ice could give way under your weight. This may damage the pool cover—and result in you being injured.
- Careful with the pool rim. Use a plastic shovel so as not to scratch the edges of the pool. Also avoid walking on the coping to clear snow from the rim of the pool as this could weaken or crush the pool structure.
- Don’t forget the skimmer drain. You should remove snow from inside and on top of the drain to keep it from cracking.
- Hire a professional, if you need to. By calling on a pool professional, you’ll be sure the work is done right and safely—both for your sake and your pool!
Information about ride sharing and the risks you might be taking.
 Ride Sharing – A dangerous business activity you might want to be informed on.
Ridesharing is gaining in popularity because it is more convenient than calling a taxi. It also provides those with insured automobiles a way to earn some extra money. Before you decide that you would like to engage in this business activity, you might wish to inform yourself about some of the unpleasant things that are happening in this industry.
Who Can Participate in Ridesharing?
In order to participate in this venture, you must have automobile insurance, but it would be to your advantage to read the fine print first. Much of the most important coverage on your personal auto insurance policy is excluded while a vehicle is being used for “public or livery conveyance.”
A public or livery conveyance is when you use your vehicle to transport people in exchange for a fee or money. Whenever coverage is excluded, as with the “public or livery conveyance exclusion”, you will be personally liable for damages or injuries caused by you while in the process of performing your ride-share duties.
Does the Company Carry Liability Insurance?
Some ride-share companies provide excess liability insurance for their drivers. Uber is one of those companies. It carries a $1 million liability policy, in excess of, your own personal liability coverage. However, this does not mean that you will always be covered. If the right circumstances present themselves, you may be entirely on your own if you cause a collision. For example, collision coverage….the coverage that pays for damage to your own vehicle…..would not be covered under the ” public or livery conveyance exclusion”!!!
A Case in Point
Lyft and Sidecar
Another thing to beware of is how executives describe their companies. Some organizations like Lyft and Sidecar shy away from the “rideshare” label, but that is exactly what these companies are offering to their customers. Drivers and riders come together for a fee, so Lyft and Sidecar drivers are also susceptible to the public or livery conveyance exclusion even if their companies advertise their services as something different.
Parents, share this information with your students away from home. Share it with your friends, share it with anyone who you think might have reason to be informed.
Read More about how your policy might respond to Ride-Sharing Situations.
How to prevent frozen pipes and how to thaw them.
Pipes that freeze most frequently are those that are exposed to severe cold, like those in unheated interior areas like basements and crawl spaces, attics, garages or kitchen cabinets. 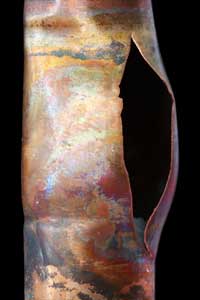 With bitterly cold arctic air and wind chills remaining below freezing, parts of the country are seeing some of its coldest weather in about 20 years, according to the National Weather Service. In these single digit temperatures, one concern for homeowners is frozen water pipes in unheated basements and crawl spaces of local homes. The American Red Cross suggests tips on how to prevent freezing and what to do if pipes do freeze. Why Pipe Freezing is a Problem Water has a unique property in that it expands as it freezes. This expansion puts tremendous pressure on whatever is containing it, including metal or plastic pipes. No matter the “strength” of a container, expanding water can cause pipes to break. Pipes that freeze most frequently are those that are exposed to severe cold, like outdoor hose bibs, swimming pool supply lines, water sprinkler lines, and water supply pipes in unheated interior areas like basements and crawl spaces, attics, garages, or kitchen cabinets. Pipes that run against exterior walls that have little or no insulation are also subject to freezing. Preventing Frozen Pipes Before the onset of cold weather, prevent freezing of these water supply lines and pipes by following these recommendations:
- Drain water from swimming pool and water sprinkler supply lines following manufacturer’s or installer’s directions. Do not put antifreeze in these lines unless directed. Antifreeze is environmentally harmful, and is dangerous to humans, pets, wildlife, and landscaping.
- Remove, drain, and store hoses used outdoors. Close inside valves supplying outdoor hose bibs. Open the outside hose bibs to allow water to drain. Keep the outside valve open so that any water remaining in the pipe can expand without causing the pipe to break.
- Check around the home for other areas where water supply lines are located in unheated areas. Look in the basement, crawl space, attic, garage, and under kitchen and bathroom cabinets. Both hot and cold water pipes in these areas should be insulated.
- Consider installing specific products made to insulate water pipes like a “pipe sleeve” or installing UL-listed “heat tape,” “heat cable,” or similar materials on exposed water pipes. Newspaper can provide some degree of insulation and protection to exposed pipes – even ¼” of newspaper can provide significant protection in areas that usually do not have frequent or prolonged temperatures below freezing.
During Cold Weather, Take Preventative Action
- Keep garage doors closed if there are water supply lines in the garage.
- Open kitchen and bathroom cabinet doors to allow warmer air to circulate around the plumbing. Be sure to move any harmful cleaners and household chemicals up out of the reach of children.
- When the weather is very cold outside, let the cold water drip from the faucet served by exposed pipes. Running water through the pipe – even at a trickle – helps prevent pipes from freezing.
- Keep the thermostat set to the same temperature both during the day and at night. By temporarily suspending the use of lower nighttime temperatures, you may incur a higher heating bill, but you can prevent a much more costly repair job if pipes freeze and burst.
- If you will be going away during cold weather, leave the heat on in your home, set to a temperature no lower than 65° F.
To Thaw Frozen Pipes
- If you turn on a faucet and only a trickle comes out, suspect a frozen pipe. Likely places for frozen pipes include against exterior walls or where your water service enters your home through the foundation.
- Keep the faucet open. As you treat the frozen pipe and the frozen area begins to melt, water will begin to flow through the frozen area. Running water through the pipe will help melt ice in the pipe. You can check for leaks in the pipe at this point. They do make an epoxy tape just for that needed temperature. This is emergency fix only.
- Apply heat to the section of pipe using an electric heating pad wrapped around the pipe, an electric hair dryer, a portable space heater (kept away from flammable materials), or by wrapping pipes with towels soaked in hot water. Do not use a blowtorch, kerosene or propane heater, charcoal stove, or other open flame device.
- Apply heat until full water pressure is restored. If you are unable to locate the frozen area, if the frozen area is not accessible, or if you can not thaw the pipe, call a licensed plumber.
- Also, adding a room temp device into a crawl space or known cold spot can alert you to a possible situation before they become critical. When connected to an alarm system, it can be monitored ahead of time and can prevent a broken pipe to begin with, and saving you time and money.
Check all other faucets in your home to find out if you have additional frozen pipes. If one pipe freezes, others may freeze, too.
It is never too early to winterize your home.
With Old Man Winter quickly approaching, now would be a great 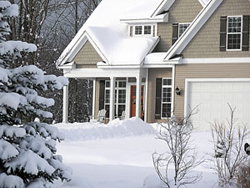 time to get prepared,by taking certain steps and you can lessen the chances of a loss to your home due to inclement weather:
- Verify that your furnace is in proper working order by contacting a heating specialist for an inspection. Heating device malfunctions, including those involving space heaters, are the second leading cause of fire deaths in the U.S. Also, most experts recommend vacuuming your heating ducts every five years.
- Check your plumbing system closely since burst water pipes can spew hundreds of gallons of water into your home. Use heat tape on any pipes exposed to extremely cold weather. Learn how to shut your water off to minimize damage from burst pipes.
- Replace any cracked or missing roof shingles and verify that flashing around the vent pipes or chimney is watertight. Roof too steep? Have a reputable contractor do the repairs for you. The cost to do so certainly would be less than the deductible under your homeowners policy should a loss occur.
How to avoid damage from an ice dam on your roof
Here’s how ice-damming becomes a problem
- Home heat rises and warms the roof underside, melting exterior snow and ice.
- Water running down the roof refreezes at the cold roof edge, building ridges to form an ice dam.
- Water can’t drain and accumulates, backing up and seeping below shingles, causing ceiling, insulation, and wall damage.
- Roof loading is further increased and can lead to collapse.
Here’s the solution
- Have your roof and gutter systems inspected regularly for tightness and drainage.
- Remove any debris or obstructing tree branches.
- Consider having additional insulation installed above ceilings or having roof vents upgraded to prevent warm air from rising to the roof.
- If problems persist, have roof heating cables installed.
Winter weather losses that might have been prevented
- At owner’s secondary home, he sets heat at 50 F, but because plumbing is located behind poorly insulated external wall, pipes burst due to extreme cold.
- Ice damming: Owner fails to clear debris from gutters, and melting snow backs up, freezes, then pushes water under shingles into home, causing severe water damage.
- Radiator pipes along non-insulated wall freeze and burst due to extreme cold and wind chill, causing basement to flood.
Source: Harleysville Risk Services
How solar panels and going green can add value to your home.
Solar energy can be a smart decision and one with many advantages. When you make use of pure sunshine to power your home, the  ethereal feel-good factor is just one of the benefits. If you are planning to install solar panels, expect some changes, the appearance of your property being one of them. Did you know that adding solar panels can also boost the value of your home…..much like a newly renovated kitchen or finished basement?
Let Your Insurance Coverage Grow With You
Green power sources can be a worthwhile investment, one that can immediately increase your property value and save you money. However, as with any addition to your property, homeowners should not ignore the impact that it can have on their insurance policy and coverage needs. If you are installing panels, it is important to discuss this with your insurance agent and talk about the specifics of the project and the value that it will add to your home. With the higher home assessment value and increased replacement cost, you will most likely need increased coverage to protect your property.
Using detached or freestanding solar panels could be an alternative (to roof-mounted units) that could also save you on insurance. While panels attached to the roof are considered to be a part of the structure, detached panels are defined differently. Depending on the insurance carrier, detached or stand-alone panels are often considered as personal property or miscellaneous other structures.
Before you decide on the question of panel placement, it is recommended that you discuss the coverage details with your agent. While many companies offer full coverage for any loss, some might just reimburse the depreciated value. Moreover, while some policies cover damages from a variety of causes, many might offer different protection levels depending on where the panels are located (on the main structure or freestanding).
Our team of knowledgeable and friendly agents are always available to provide you with valuable insights and guidance about your homeowners policy. No matter what type of panels you are considering, we will be able to answer all your questions and thoroughly review your existing insurance coverage. Going green is taking a step in the right direction. Count on us to help you receive the best possible coverage every step of the way.
How to be properly prepare during the hurricane season.
June 1 marks the official start of the 2016 Atlantic hurricane season.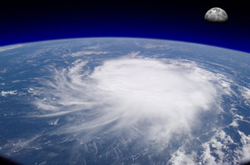 The National Oceanic and Atmospheric Administration is predicting an “active or extremely active” season this year.
NOAA says there are likely to be 13 to 20 named storms this year “of which 7 to 11 could become hurricanes … including 3 to 6 major hurricanes.” Climate Central notes that NOAA doesn’t predict how many storms will actually make landfall, but “some factors suggest that the U.S. will run a higher risk of landfalling tropical storms and hurricanes this year than in 2012.”
Here is a list that can help you be prepared.
- Water – at least 1 gallon daily per person for 3 to 7 days
- Food – at least enough for 3 to 7 days
- non-perishable packaged or canned food / juices
- foods for infants or the elderly
- snack foods
- non-electric can opener
- cooking tools / fuel
- paper plates / plastic utensils
- Blankets / Pillows, etc.
- Clothing – seasonal / rain gear/ sturdy shoes
- First Aid Kit / Medicines / Prescription Drugs
- Special Items – for babies and the elderly
- Toiletries / Hygiene items / Moisture wipes
- Flashlight / Batteries
- Radio – Battery operated and NOAA weather radio
- Telephones – Fully charged cell phone with extra battery and a traditional (not cordless) telephone set
- Cash (with some small bills) and Credit Cards – Banks and ATMs may not be available for extended periods
- Keys
- Toys, Books and Games
- Important documents – in a waterproof container or watertight resealable plastic bag
- insurance, medical records, bank account numbers, Social Security card, etc.
- Tools – keep a set with you during the storm
- Vehicle fuel tanks filled
- Pet care items
- proper identification / immunization records / medications
- ample supply of food and water
- a carrier or cage
- muzzle and leash
Why insurance companies might not insure you if you have knob & tube wiring.
This is a good example why insurance companies will generally not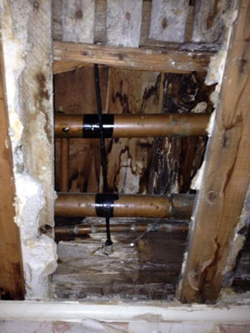 insure property with active Knob & Tube electrical Wiring. This photo shows a live , poorly insulated, wire that was arcing(sparking) when copper plumbing was added to the home. What option would you choose?The quick fix and Electrical tape on the pipe or the real fix? Remove all old Knob & Tube wiring. A house built with patches will eventually crumble or burn. Don’t let anyone shortcut your families safety.
Snow accumulation on roofs and the dangers it presents.
This message is a reminder from the Department of Public Safety and the Department of Fire Services.
The February 8th winter storm that hit Massachusetts presents a variety of challenges. As we approach the new week, it is anticipated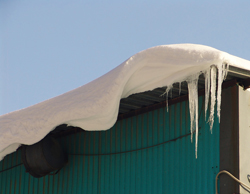 that warm temperatures and rainfall may blanket portions of Massachusetts . With the recent heavy snowfall, rain will increase the weight of snow on roofs throughout the Commonwealth. Fire and building services need to plan for the onset of storm related issues.
Flat roofs, lower roofs that meet higher roofs, and areas with parapets or areas of drifting snow are major concerns. Many commercial building owners may hire or bring staff on to clear snow from flat roofs to help ease the burden of additional weight. In doing so, they will also make it easier for fire services to access and traverse these areas in the event of an emergency. In areas of significant snowfall consideration should be given to the additional weight firefighters may contribute on these roofs.
Homeowners, tenants, and businesses should be cognizant of the dangers posed by heavy snow loads on roofs, and the warning signs of potential structural weaknesses. In most instances, risks posed by accumulated snow on roofs may be mitigated by safely removing the snow. from roofs of both commercial buildings and homes. As temperatures are expected to rise and fall over the next several days, every effort should be undertaken now to safely remove snow from roofs.
Removing snow from rooftops will minimize the likelihood of structural collapse. Flat and low pitched roofs, most often found on industrial buildings, but are also used in certain home designs, are at the greatest risk of buckling under heavy snow and ice accumulations. Lower roofs, where snow drifts or accumulates from higher roofs are also vulnerable.
Did you know that a cubic foot of dry snow weighs about seven pounds? While a cubic foot of wet snow may weigh up to 20 pounds. So, if at all possible, consider hiring someone to help with all of the snow clearing.
Here are some helful tips for a Homeowner in the removal of snow and ice from roofs and other areas.
Wear protective headgear and goggles when performing any of these tasks.
Use a snow rake for pitched roofs (available at most hardware stores) to remove snow from your roof.
Start from the edge and work your way into the roof.
Keep gutters, and drains clean, free of ice and snow and keep downspouts clean at ground level.
Try to shave the snow down to a 2 or 3 inches on the roof instead of scraping the roof clean, which will risk damage to your shingles or other roof covering.
Shovel snow from flat roofs throwing the snow over the side away from the building. Most plastic shovels are better, except for the ones with curved blades-those too will do some damage to your roof.
Remove large icicles carefully if they’re hanging over doorways and walkways. Consider knocking down icicles through windows using a broom stick.
Consider hiring professionals to do the job. The combination of heights plus ice makes this one of the more dangerous house chores.
If you don’t hire professionals, at least have someone outside with you in case anything does go wrong.
Keep in mind that any metal tool could conduct electricity if it touches a power line and metal tools may cause damage to the roof.
Here is list of things that homeowners SHOULD NOT do.
Don’t use open-flame devices to remove snow and ice.
Unless approved by a registered professional engineer, don’t add your weight or the weight of equipment to the roof.
Don’t use electric heating devices like hair dryers or heat guns to remove snow and ice.
Don’t use a ladder since ice tends to build up on both the rungs of the ladder and the soles of your boots.
There are several ways to recognize problems with the roof.
Sagging roof
Creaking, cracking or popping sounds
Cracked or split wood members
Bends or ripples in supports
Sheared off screws from steel frames
Sprinkler heads that have dropped down below ceiling tiles
Severe roof leak
Doors or windows that are difficult to open
Bowed utility pipes or conduit attached at ceiling
Cracks in walls or masonry
Here are some other safety tips for homeowners.
Clear snow away from downspouts so water has a place to go.
Never use cooking equipment intended for outside use indoors as a heat source or cooking device.
Do not be tempted to use a heat gun or open flame torch to melt the ice; the risk of starting a fire is huge.
If you feel you are in immediate danger, get outside and call 9-1-1.
Never use your oven for heat.
Space heaters need space, so use them in a 3-foot circle of safety; free of anything that catch fire. Space heaters are not designed to replace your central heating system; they are only designed to provide a little extra heat on a temporary basis. So be sure to turn them off when you leave room or go to bed at night.
Clear snow away from furnace and dryer exhaust vents to prevent carbon monoxide poisoning.
Make sure you smoke alarms and carbon monoxide detectors are working.
Check your outside fuel (furnace) and dryer exhaust vents, making sure that they are not obstructed by snow or ice.
Here are some other safety tips for Business owners.
If you are going to use a snowblower, make sure that it has been approved by a structural engineer to be used on a roof, and that the blower is set to a high level above the roof so as not to damage roof membrane.
Keep gutters, downspouts and drains clean.
Shovel snow from flat roofs throwing the snow over the side away from the building.
Try to shave the snow down to a 2 or 3 inches on the roof instead of scraping the roof clean, which will risk damage to your shingles or other roof covering.
Keep in mind that any metal tool could conduct electricity if it touches a power line.
Use a snow rake for pitched roofs ( available at most hardware stores) to remove snow from your roof.
Remove large icicles carefully if they’re hanging over doorways and walkways.
Always wear protective headgear and goggles when performing any of these tasks.
Most plastic shovels are better, except for the ones with curved blades-those too will do some damage to your roof.
Start from the edge and work your way into the roof.
There are several ways to recognize problems with the roof on Commercial Buildings.
Sagging roof steel – visually deformed
Cracks in welds of steel construction
Water puddles where it never has before
Bowed utility pipes or conduit attached at ceiling
Creaking, cracking or popping sounds
Bends or ripples in metal supports
Severe roof leaks
Sheared off screws from steel frames
Doors that pop open
Doors or windows that are difficult to open
Cracks in walls or masonry
Cracked or split wood members
Sprinkler heads pushed down below ceiling tiles
What to do if you have these problems.
Call your local building or fire department.
If there is imminent danger, evacuate the building and call 911.
What other assistance is available?
Many fire departments have regional technical rescue teams available to local departments in case of collapse.
Massachusetts Task Force 1 is an Urban Search and Rescue Team in Beverly . The team is comprised of Police, Fire, EMS and Civilians who respond to major disasters under a contract with the Federal Emergency Management Agency (FEMA). Currently there are 150 people on the MATF-1 team.
How to remove ice dams from roof safely.
Winter presents homeowners with many unique challenges as the weather changes. Among the winter-fueled obstacles that come each year, ice dams can be one of the most serious. Ice dams that build along the edges of the roof can add to the amount of snow and precipitation that will accumulate. A snow-packed roof is bad news. Preventing the accumulation of ice on the roof edge should be a regular part of every homeowner’s annual winter preparation.
Ice dams form because of the roof’s uneven temperature. The roof becomes heated directly above the interior spaces of the house. 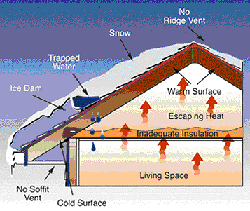 However, this heat does not reach the edges and the overhang. As a result, melted snow and rain will flow to these areas where it will freeze once again. Allowing your roof to maintain an even temperature starts with insulation. Your goal is to stop warm air in the house from flowing into the attic. To do this, seal all the gaps in addition to ensuring that all of the insulation is in good shape. The ideal temperature for the roof deck itself is 30 Fahrenheit. When the entire roof maintains a consistent temperature, the snow eventually clears evenly and naturally. It is also critical to have good ventilation between the roof deck and the insulation. Poor ventilation leads to the accumulation of moisture in this area. Excess moisture compounds your problems by encouraging lamination deterioration and mold growth.
Soffit vents are also a valuable tool for fighting ice dams. These kinds of vents allow cold air to circulate beneath the entirety of the roof. Additional material that ensures seals may be needed during the winter as well. Adding extra insulation in extreme conditions never can hurt. Ice damming could also be related to the deterioration of the flashing around chimneys and other roof gaps. Sealing and insulating ducts and duct pipes that flow through the roof and attic also keeps heat from leaking towards the underside of your roof. Fiber-reinforced mastic on the joints of HVAC ducts can do wonders for heat retention.
In the event that you are experiencing ice dams during the winter, there are a few symptoms that indicate that you may have a problem. Ice dams on the roof will cause specific areas of the roof to transmit cold temperatures. Despite insulation, the area where the ice dam has formed will transmit its lower temperatures through to the trusses that connect with your ceiling. As this cold spot comes in contact with the home’s warm air, condensation occurs. The moisture traps dust and eventually forms mildew that will appear darker than the rest of the ceiling. When this occurs, begin by bleaching the mildewed surface. In some cases, this cleaning will be enough to remedy the problem. However, excessive staining can require a stain-blocking primer and a layer of paint. Should the trusses become cold enough to actually shift as they contract, you are likely to see cracks appear along the joint of the ceiling and the wall. These cracks can be caulked temporarily. The best long-term solution is to cover the joints with molding. Attach the molding only to the ceiling so that it is free to move with the structure as the temperatures fluctuate.
Tips to help with ice dams
Making a homemade Ice melt socks by using old panty hose can create melt channels in the ice dam. These channels will allow melted 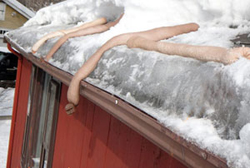 water from your roof to drain off your roof, reducing the ice dam effect. This method may look & sound funny, but it is one of the safest way to create a melting path without heating cables or chipping away at ice dams. Make sure you use ice melter that is safe for your roof, check with your local hardware expert on this prior to using.
Always take caution when attempting to remove any ice damn, consult with a professional first. Your safety comes first.
Does your home owners insurance cover earthquakes?
On October 16, 2012, the state of Maine was shaken by a 4.0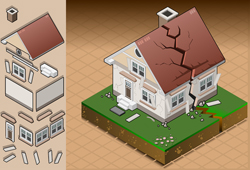 magnitude earthquake in the area of Hollis, just west of Portland. The quake was felt as far away as Boston, Massachusetts as well as New Hampshire and Rhode Island. Though no serious damage or injury has been reported, the earthquake spurred a number of questions from homeowners regarding insurance coverage for such events.
New England Earthquakes
The earthquake was something of a surprise to many people who didn’t know that the New England area is shaken by periodic earthquakes every year. In fact, the New England area suffered a number of recent earthquakes from 1975 to 1988. In 1904, an earthquake of the magnitude 5.7 to 5.9 shook the Eastport area. In 2006, the Arcadia National Park area experienced a series of earthquakes. Most of the earthquakes are small and do little damage, but larger earthquakes can, and have, occurred in the New England area.
Earthquake Fault lines
Earthquakes are usually associated with the state of California and other western states, but earthquake fault lines run across the Midwest, the South, the Southeast and the Northeast. In fact, 39 of the 50 states lie in moderate to high-risk areas for earthquakes.
Typical Earthquake Damage
Damage from an earthquake can be very minor, or it can cause serious structural damage to a home or building. Generally, wood structures have the flexibility to withstand strong earthquakes. Stone, brick and adobe buildings withstand the severe shaking poorly.
The earthquake itself is not the only problem that can cause damage to a structure. Cracks in the foundation, flooring, window frames, and chimneys can occur. Entire walls can collapse, and interior structures can become severely compromised, requiring extensive rebuilding. Adjacent structures can become unstable and fall onto roofs and walls. Aftermath events such as tsunamis, fires or floods can create additional damage.
Are Earthquakes Covered?
Earthquakes are not covered under standard insurance policies. You must arrange for a special endorsement, to your Homeowners Policy, to cover damage from earthquakes.
Earthquake Insurance
Earthquake coverage typically includes a deductible of anywhere from 2 to 20 percent of the replacement cost of the home or building. As always, the higher the deductible, the more that homeowners can save on premiums. The cost of an earthquake policy can vary considerably from $85 per year to several hundred dollars.
Factors that Affect Insurance Costs
A number of different factors can influence the cost of earthquake coverage. The soil consistency in your area can affect the stability of your home’s foundation. The age of your home can make it more vulnerable to earthquake damage. The type of construction materials used will affect the price of the policy. The structure’s proximity to known fault lines can also cause you to pay more for your earthquake insurance.
Please contact O’Connor& Co. Insurance Agency, Inc. 800-254-9594 for an earthquake coverage quote today.

